Most of
us throw away the inedible parts of our fruits and vegetables in the trash or
compost bin. Up until recently, I did
the same thing, until I heard Lorena, a garden friend, say that she grows her
own pineapples and she never bought seeds.
In fact, she didn’t even buy the pineapple. She was purchasing a fruit salad from a
street vender and she noticed he was setting aside the pineapple leaves with
the top part attached. After chatting it
up with him, Lorena asked why he setting aside the pineapples. He said he grew his own and that he also sold
pineapple plants to friends and neighbors. He explained the process to her and she passes
the word to me. Now, here I am sharing
my excitement with you.
It
takes about two years for the first pineapple to emerge, but from that point
on, it’s good eats! I wasn’t as lucky as
my friend to get free pineapples; I purchased my fruit from a store. Fortunately pineapples are in season this November and December and are super sweet and cheap. I also haven’t eaten the fruits of work yet, but
I have already grown roots and even planted one. I didn’t want to wait two years write this
blog, instead I wanted to do updates and share the milestones of my pineapples.
Begin with a whole pineapple:

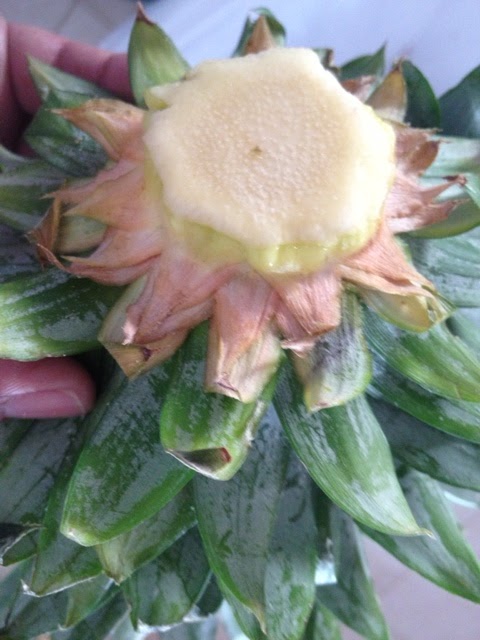
Cut off the top part off with about an inch of the fruit still attached:

There are two ways to do this next part and get the same result. 1. Hold the leaves part and twist the fruit part until they split apart. 2. Or, trim the fruit part off until you get to the core area.
Peel all the lower leave off until you get a base of about 2 inches. Some of the fruit might already have roots.

Place in a jar with water and fill just below the leaves start. Change the water every few days and watch as the roots begin to emerge.

Once the roots are formed, some of the leave may turn brown. You can now plant and water when soil begins to dry.

I'm excited to see how these continue to grow and change in the following months.